
Stereo Microphone Techniques
by Larry Seiler
There are a surprising number of techniques for recording groups—from small ensembles to large choirs and orchestras—using a pair of microphones or in some cases three microphones. These techniques are, for the most part, suitable for making both live and studio recordings. Many of these techniques can also be used to make stereo recordings of a single instrument such as an acoustic guitar, a piano, or a harp.
If you are making live recordings, the choice of technique may be dictated more by the restrictions of the venue than that of obtaining the desired sound quality. Doing live recordings is a challenge fraught with all sorts of compromises and problems, such as poor room acoustics, noises from the audience such as coughing, sneezing, and page turning, and limitations on microphone placement. For example, if the optimum location for a pair of microphones is in the front row, the venue owner may be reluctant to allow it since this is probably the highest priced seats in the house.
Another considerations is whether you are recording the performance or broadcasting it live on radio. The main goal of many of the techniques is to make the signal mono-compatible for those in the radio audience listening in mono rather than stereo. Indeed you will see that many of the techniques discussed below were developed by broadcast organizations. On the other end of the spectrum are the record labels whose main goal is to produce a recording with the best stereo experience with no expectation of mono compatibility. Mono compatibility is the ability to collapse a stereo signal into mono with no loss in fidelity or deterioration of sound quality due to phase cancellation. Some people feel that the issue of mono-compatibility is no longer as big a problem as it once was since most FM radios and TV sets are sold with stereo capabilities and very few listeners today listen in mono.1 However, it is still a consideration for most broadcasters when miking live performances.
The alternative to using stereo microphone placement is to mike each instrument individually. This option gives the recording engineer almost complete control since he can pan and balance each instrument in the mix. It also reduces problems with audience noises and room acoustics. This method works fairly well if you are recording a string quartet using four mikes, but if you are recording a 60-piece orchestra, using 60 microphones can not only be extremely expensive, but the complexity of mixing 60 separate signals could be quite daunting. Routing multiple microphone cables on stage can also be a problem—one to which many venues may object. However, if you have watched orchestral performances on PBS, you have probably seen a large orchestra using multiple mikes. In actual practice, some instruments are individually miked (clarinets, bassoons, and oboes) while in other cases only sections or parts of sections of instruments are miked (trumpets, violins, and French horns). There are probably a dozen microphones used just for the percussion section alone. Although multiple miking gives the engineer a great deal of control, it tends to produce a flat stereo image. The perception of depth—the sense of distance of instruments to the listener— as well as concert hall ambience is missing. So it is easy to see why many engineers prefer to use the stereo microphone techniques discussed in this article.
Stereo microphone placement can be broken down into four categories: coincident pairs, near-coincident pairs, spaced pairs, and baffled pairs. Obviously, there are advantages and disadvantages to each technique. There are several methods of implementing the configuration of each category. Each of these variations will be discussed below. In most cases the microphones chosen for each application should be as similar as possible, meaning they should be of identical brand and type. Preferably you should use a matched pair, with the frequency response of each microphone as close as possible to one another.
As we look at each technique, it is important to consider the factors that go into creating a stereo sound image or stereo field. These include time of arrival, intensity or volume differences, and frequency response (spectral) differences.2,3 How microphone placement affects each of these parameters determines to a large extent the stereo image that is created.
Coincident pairs
In this method (also called crossed pairs and sometimes called the X-Y method, although X-Y is often used to refer to a specific version of coincident pairs) a pair of microphones are set up in such a way that their capsules are almost touching or one is directly above the other and angled apart. In other words the capsules are coincident. (The microphone should not touch one another as this could introduce mechanical noise.)4 The biggest advantage to this technique is that since the capsules are at the same point, there is no time of arrival differences between the left and right mikes and, therefore, no phase cancellation. This makes the setup mono-compatible. The main disadvantage is that the stereo image is rather narrow, depending solely on differences in level to produce the stereo field.5
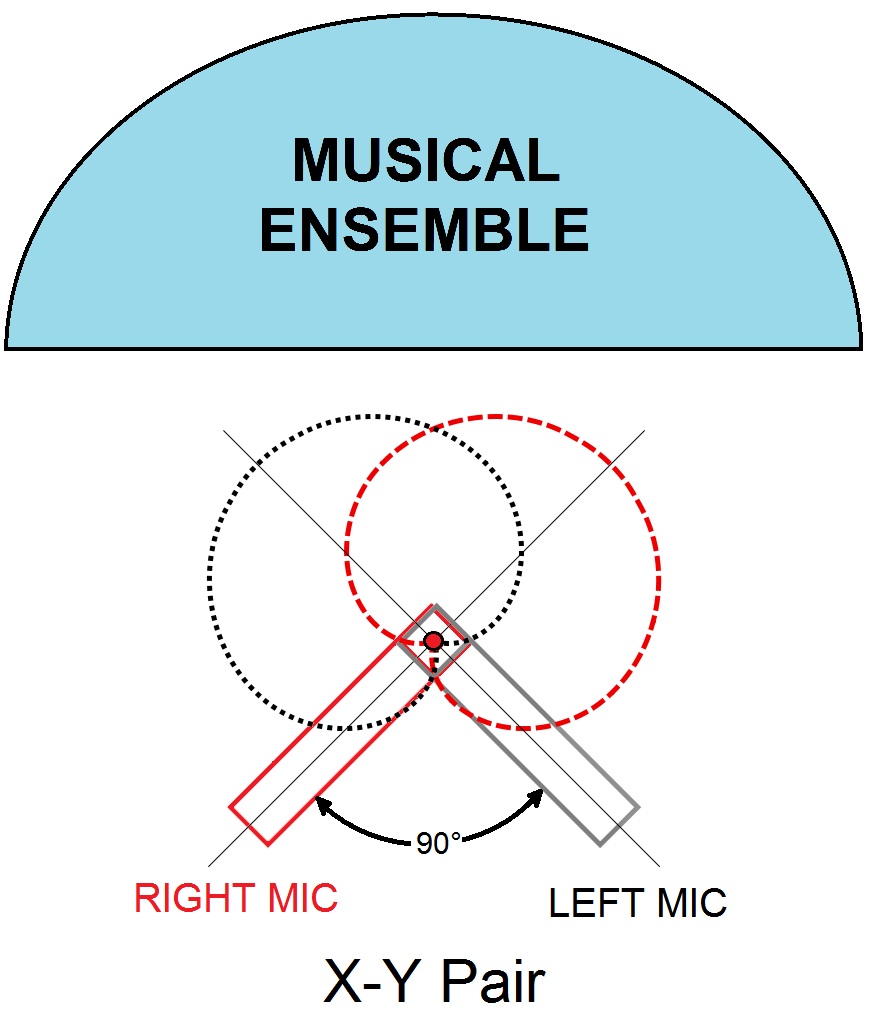 X-Y Pair
The X-Y technique uses two cardioid microphones in a coincident configuration angled typically at 90° apart (45° to either side of a center line that faces the sound source). Angles from 90° to 135° can be used and even as high as 180° have been reported.6 The X-Y technique is sometimes used in the near coincident configuration with the two mics spaced about 12 inches apart.7 In the coincident mode phase cancellation problems are essentially nil since the capsules are so close together resulting in good mono compatibility. It is considered to be the second best choice for mono compatibility after the mid-side technique.8 However, the stereo field is rather narrow. The width of the field can be improved by increasing the angle, but 135° is considered the maximum.9
Mid-Side Technique
 The mid-side technique (also called middle-side, mono-stereo, or abbreviated as M-S or M/S) was devised by Alan Blumlein of EMI records. It combines one microphone facing forward at the center of the sound source (the “mid” microphone) with a microphone that has a bi-directional (figure-eight) pattern facing left or right (the “side”). The mid microphone can be just about any pattern, but a cardioid pattern seems to be the most common. Some people say matching the two microphones is not necessary, but others say they should be matched as closely as possible, especially for larger sources.10 A good way to match them is to choose two muli-pattern large diaphragm condenser microphones, with the mid one set to ommi or cardioid and the side one set to a figure-eight pattern. Those using unmatched microphones report good results using everything from omni to supercardioid patterns for the mid microphone and even using a mix of condenser and ribbon microphones for the side microphone.37
Unlike most of the other stereo miking techniques, in which the signal from the two microphones are panned hard left and hard right, this technique requires some signal manipulation to develop the stereo signal. The signal from the mid microphone provides a very good mono signal. Since the two lobes of the figure-eight microphones are picking up essentially sound from the left and right sides of the sound stage (primarily reflected sounds), they can be used to develop the stereo signals by combining them with the mid signal. In a figure-eight microphone, the sound picked by the front (in this case the left side) is 180° out of phase with the rear (the right side). So the left portion of the signal can be considered to be a positive signal while the right is a negative one. To create a left channel, you need to add the mid and side signals. To obtain the right channel, you need to subtract the side signal from the mid signal. This can be done in your mixing console or digital audio workstation (DAW) by mixing the two signal for the left channel and mixing a polarity-reversed side signal with the mid signal to produce the right channel. Of course, if you face the side microphone to the right, this procedure will be reversed.
The M-S technique provides good stereo localization, a strong middle image, and excellent mono compatibility. However, possibly its greatest advantage is that the stereo field can be adjusted even after the performance is over. In fact, the polar patterns achieved by an omni and figure-eight microphone at right angles is equivalent to two cardioid mics set at 90° apart in an X-Y pattern. The difference is that with M/S you have the ability to adjust the width of the stereo field. By adjusting the ratio of mid signal to side signal, you can achieve anything from a fairly wide stereo image to a rather narrow one. Of course, you can pan the signals with other techniques, but you are only mixing together the left and right signal. With M-S you are mixing more or less of the mono signal into the mix, providing greater control over the final mix.11
Blumlein pair
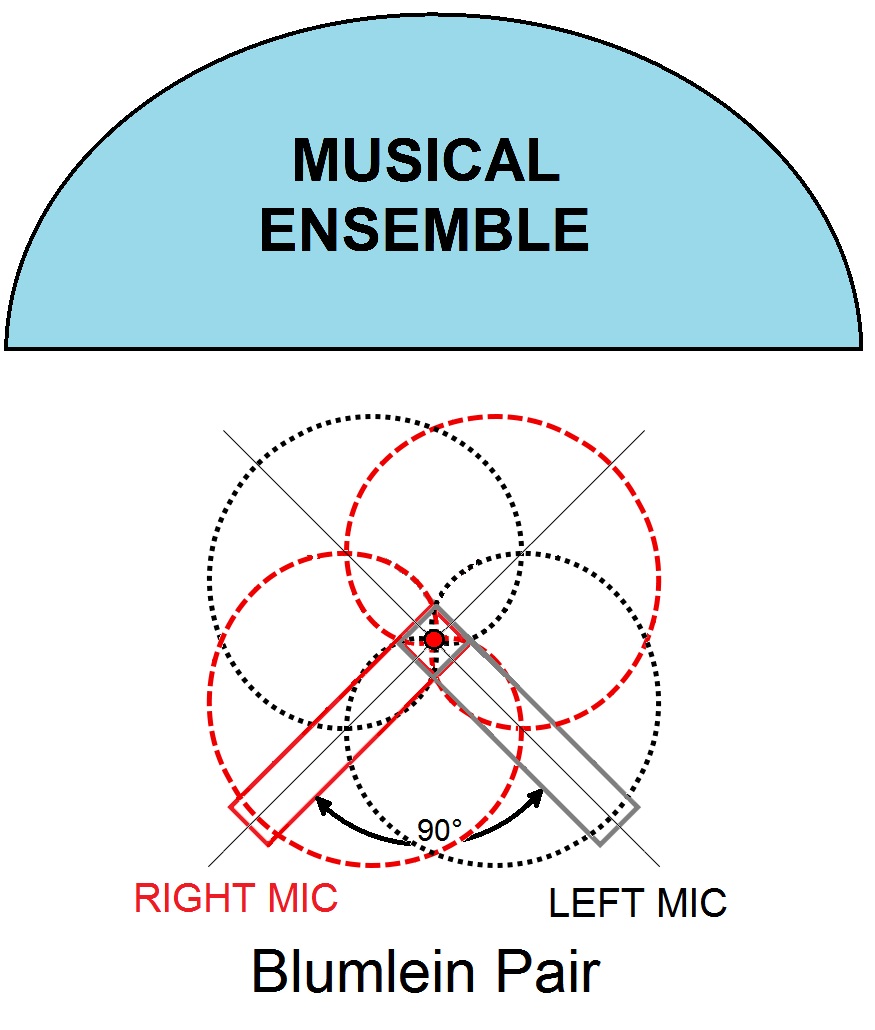 The Blumein pair (also called a Blumlein array or the stereosonic technique) was also conceived by Alan Blumlein. Although he never actually used this method of recording, Blumlein created it as a theoretical concept and received a patent for it in the UK in 1931. The recording method was named in his honor many years after he passed away.12
The Blumlein method consists of a coincident pair of bi-directional (figure-eight) microphones placed at an angle of 90° from one another, with the center line bisecting that angle pointing at the music source. This configuration provides a high degree of stereo separation along with a large amount of room ambience. The Blumlein technique produces a good, natural-sounding stereo image, but the sound quality is greatly influenced by the room acoustics and the size of the sound source. Since it is coincident, it provides excellent mono compatibility. Both condenser and ribbon microphones have been used with this technique. This technique should not be used if room acoustics or audience noise will be a problem.
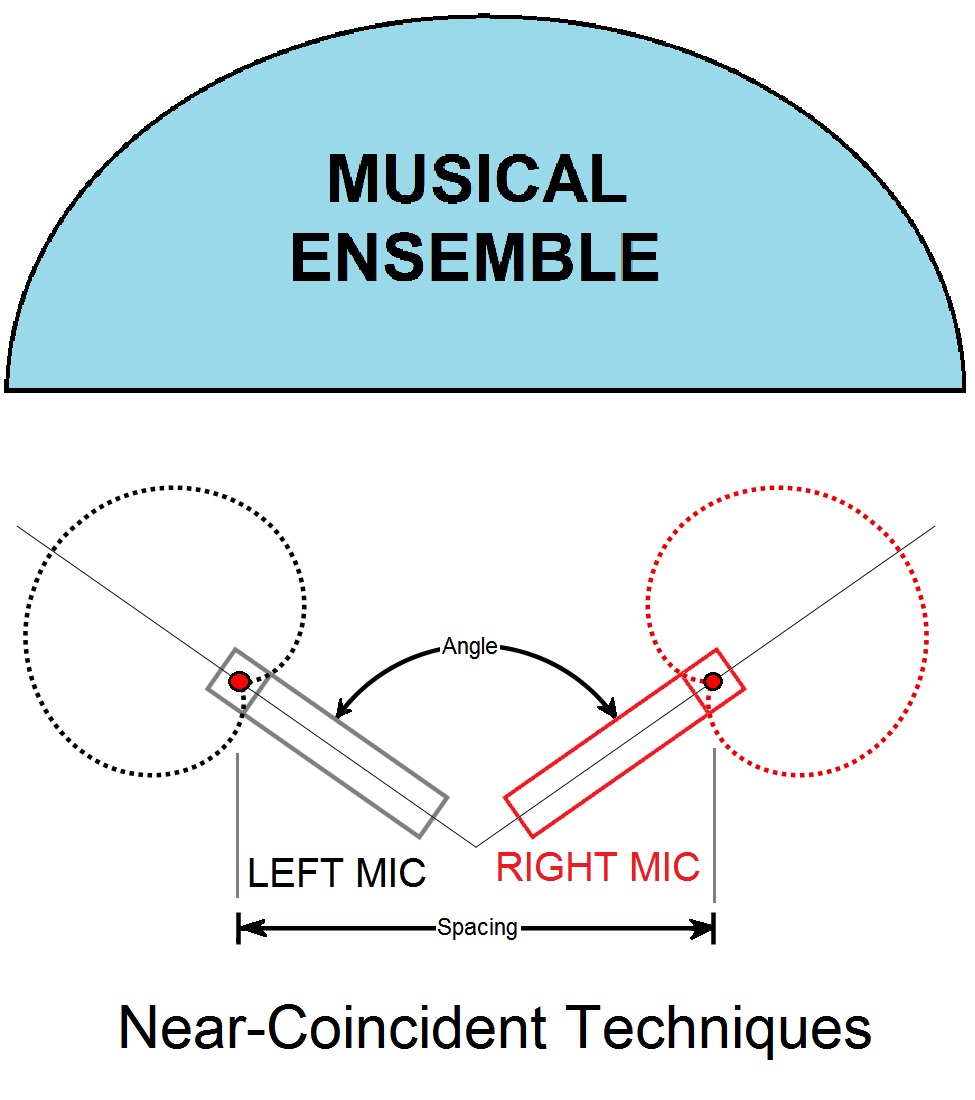
Near-Coincident pairs
Since the ears on a human head are spaced several inches apart, engineers have deemed that using a recording technique with the mikes spaced a similar distance should produce a stereo image similar to that of human hearing. That was the original reason for the near-coincident microphone technique, although most current versions no longer try to emulate the size of the human head. The stereo image depends on both time of arrival and intensity differences. Because the microphone capsules are not coincident, some phase differences can occur, but they should be much lower than when using spaced pairs. The mono compatibility is somewhat less than coincident pairs, but for the most part is still considered to be very good. For this reason, many of the techniques were developed by and for radio broadcast organizations, as many of the names of these techniques show.
ORTF technique
 The ORTF technique, which was developed about 1960 by the Office de Radiodiffusion-Television Francaise, the French broadcasting organization, uses two cardioid microphones spaced 17 cm (6.7 inches) apart and angled at 110°. This method provides a realistic stereo field with acceptable mono compatibility. Using cardioid microphones provides for less ambient noise and effects from room characteristics.13
NOS technique
The NOS technique was developed by the Dutch Broadcasting Foundation (Nederlandse Omroep Stichting). This method is similar to the ORTF and uses two cardioid microphones spaced 30 cm (11.8 inches) apart and angled at 90°. This method provides a similar realistic stereo field to ORTF and acceptable mono compatibility. Some people consider this technique easier to set up since a 90° angle is easier to measure. Effects of ambient sounds are similar to the ORFT method.14
DIN technique
The DIN technique is specified by Deutsches Institut für Normung (the German national standards organization). This method is similar to the ORTF using two cardioid microphones, but they are spaced 20 cm (7.9 inches) apart at an angle of 90°. Results are similar to the ORTF technique, but it more suitable to miking at shorter distances, such as a piano.15
EBS technique
The EBS technique was developed by Eberhard Sengpiel of the Tonmeister Institute of the Berlin University of the Arts (Germany). It is similar to the NOS and DIN techniques as it uses two cardioid microphones angled at 90°, but spaced 25 cm (9.8 inches) apart. Sengpiel suggests using this arrangement as a starting point and experimenting to find the best setup. The stereo field and mono compatibility are similar to the above two techniques.16
RAI technique
The RAI technique was developed by the RAI, Radiotelevisione Italiana (known until 1954 as Radio Audizioni Italiane), the Italian broadcasting agency. It is similar to the above techniques, but uses two cardioid microphones spaced 21 cm (8.3 inches) apart and angled at 100°.17
Olson technique
Developed by Lynn T. Olson of Audionics, Inc. in 1979, the goal of this technique is to create a 180-degree soundfield. It uses two hypercardioid microphones spaced 5 to 20 cm (2 to 8 inches) apart and angled at 135°. It has the widest angle of acceptance of any of the near-coincident methods. As a result it can suffer from indistinct sound in the middle. Also called the Olson Stereo 180 microphone system.18
A-B technique
 The A-B technique is usually classified as a spaced-pair technique, but the allowable spacing has a wide range that goes as low as l7 cm (6.7 inches).19 This places it in the near-coincident range. This technique will be discussed more fully when we take up spaced pairs.
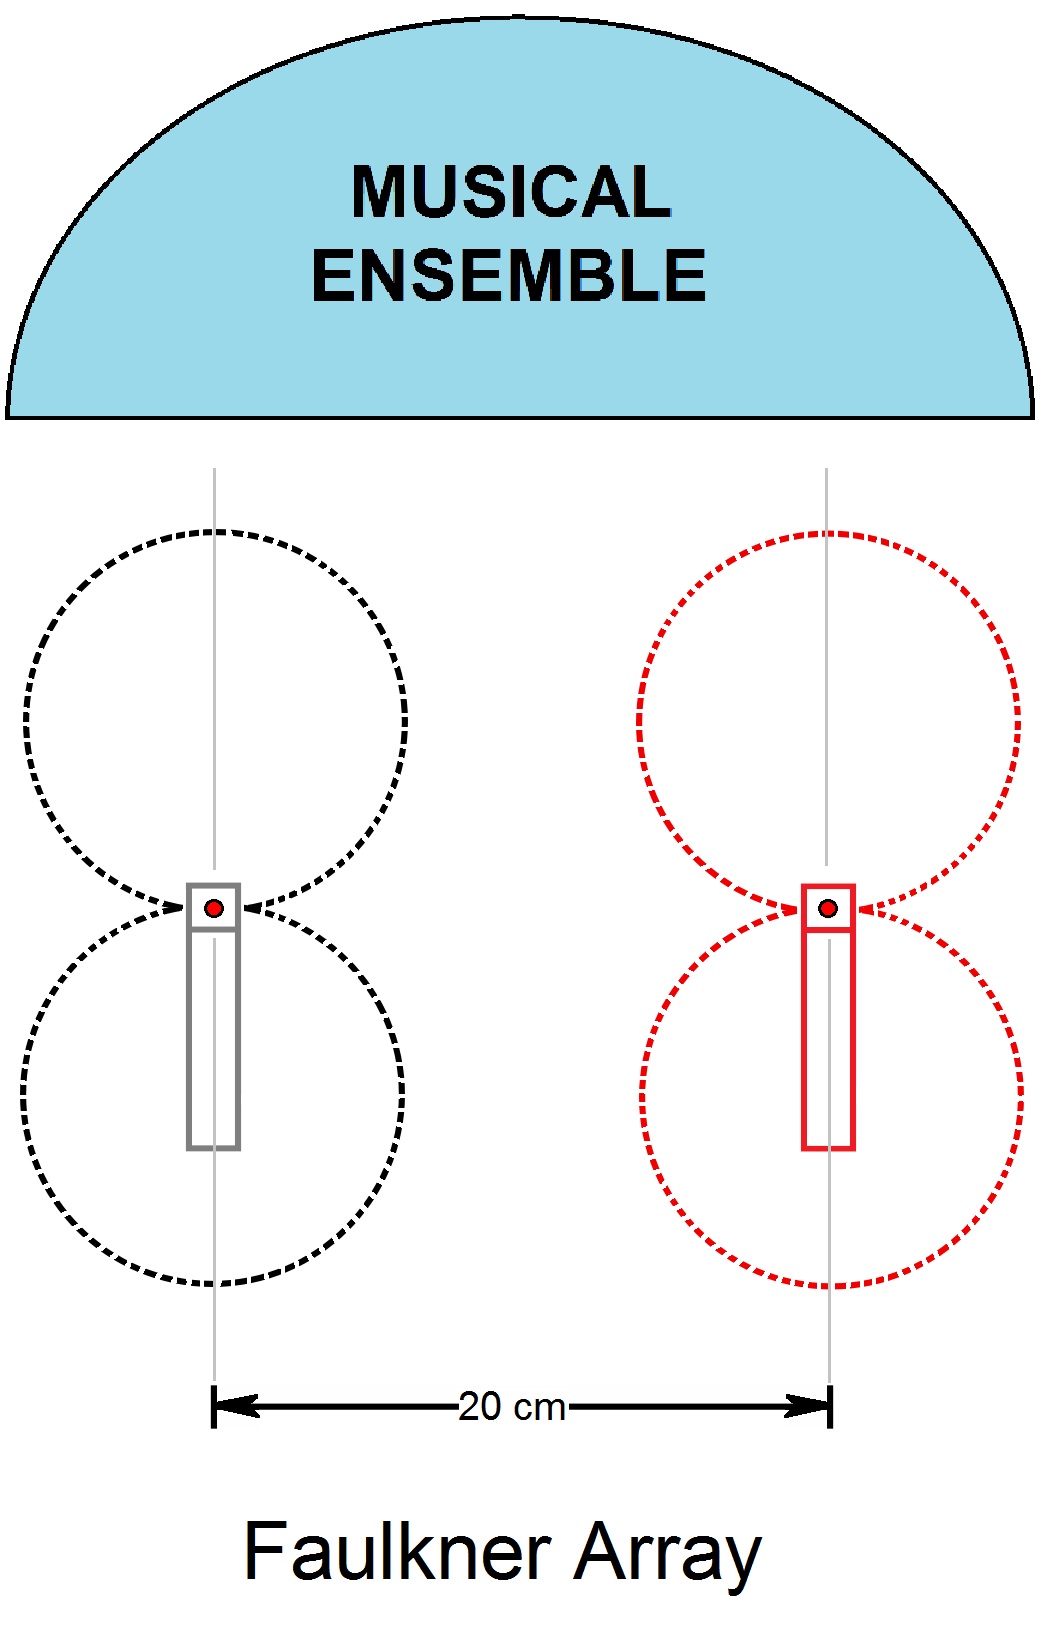
Faulkner array
Sometimes called the Faulkner pair or the phased array, this technique was developed by recording engineer Tony Faulkner as an alternative and an improvement upon the Blumlein array. It uses two bi-directional (figure-eight) microphones spaced 20 cm (7.9 inches) apart and and aimed straight ahead at the music source. Some people argue that since the mics are not angled, this technique should be classified as a spaced pair.20 Since the microphones are facing forward, you can place them further away from the sound source to provide a more natural balance between near and far elements within the sound source. Althought this technique is not mono compatible, Faulkner claims that there have been few problems in usage. Because the technique uses figure-eight micorphones, this technique is not recommended when ambient noises will be a problem.21
Spaced pairs
This category uses two, sometime three, microphones pointing forward and spaced several feet apart. Unlike the near-coincident category above, which normally specifies distances between mics to the nearest centimeter, this category usually gives a range of distances such as 3 to 10 feet. The guiding principle in spacing microphones is the 3-to-1 rule. This rule of thumb states that the distance between two mics should be three times the distance from the mics to the sound source. The purpose of this rule is to minimize phase problems. However, with many guidelines in stereo miking, this rule is often easier said than done in typical real world applications. Other factors also come into play when setting up the spacing between microphones. As a general rule, the larger the group being recorded, the wider the spacing should be. However, spacing the microphones too far apart can exaggerate the separation and cause insufficient coverage of the center of the sound stage, creating the “hole-in-the-middle” effect.
Unlike the near-coincident method, the spaced pair method does not try to emulate human hearing. Using spaced pairs produces a greater spread of the perceived stereo image. The stereo image of spaced pairs is produced by a combination of time differences, level differences, and spectral differences. Most listeners are not listening through headphones, but through a pair of stereo loudspeakers placed several feet apart. Reproducing music that has been recorded with microphones placed several feet apart through such speakers should be a good combination. The disadvantage is that off-center images tend to be unfocused and hard to localize. 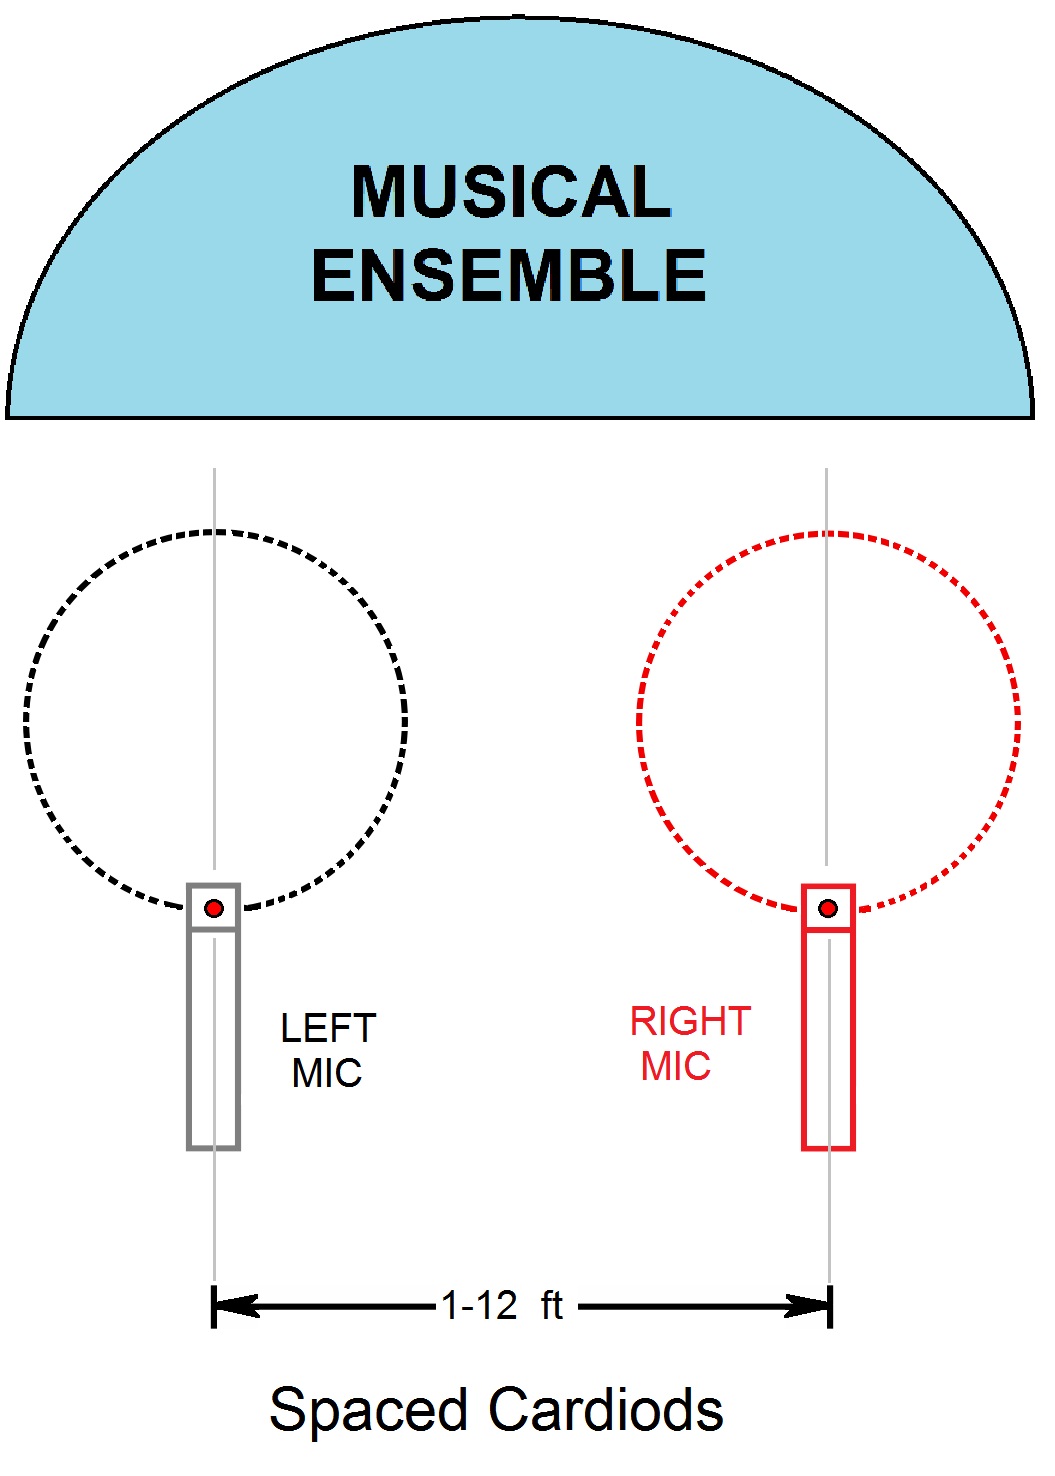 The stereo image on the sides are produced by timing differences which the human ear has more difficulty in distinguishing. Center images tend to be clear. Overall, the image is more diffuse and blended rather than sharp and focused.29 This technique is not mono compatible. In practice this has not proven to be a great problem.
One of the confusing things about stereo microphone techniques is the extent of alternative nomenclature used for the various techniques. Adding to the confusion is the fact that some sources use the term A-B (also written as A/B) to refer to this category and typically refer to the coincident category as X-Y (also written as X/Y). Sometimes X-Y is used for both coincident and near-coincident techniques.30 To further confuse the issue, the BBC (British Broadcasting Corporation) and many parts of Europe use the term A-B to refer to the coincident pair category.31 In this article, we use the American terminology.
Spaced Cardioids
 This method consists of two cardioid microphones facing the sound source and placed 1/2 to 4 meters (1.5 to 12 feet) apart. The larger spacing is used for larger sound sources such as a large orchestra. Care must be taken to avoid having too wide of spacing. Using cardioid pattern mics produces good directionality without picking up an excess of ambience and room noise.32
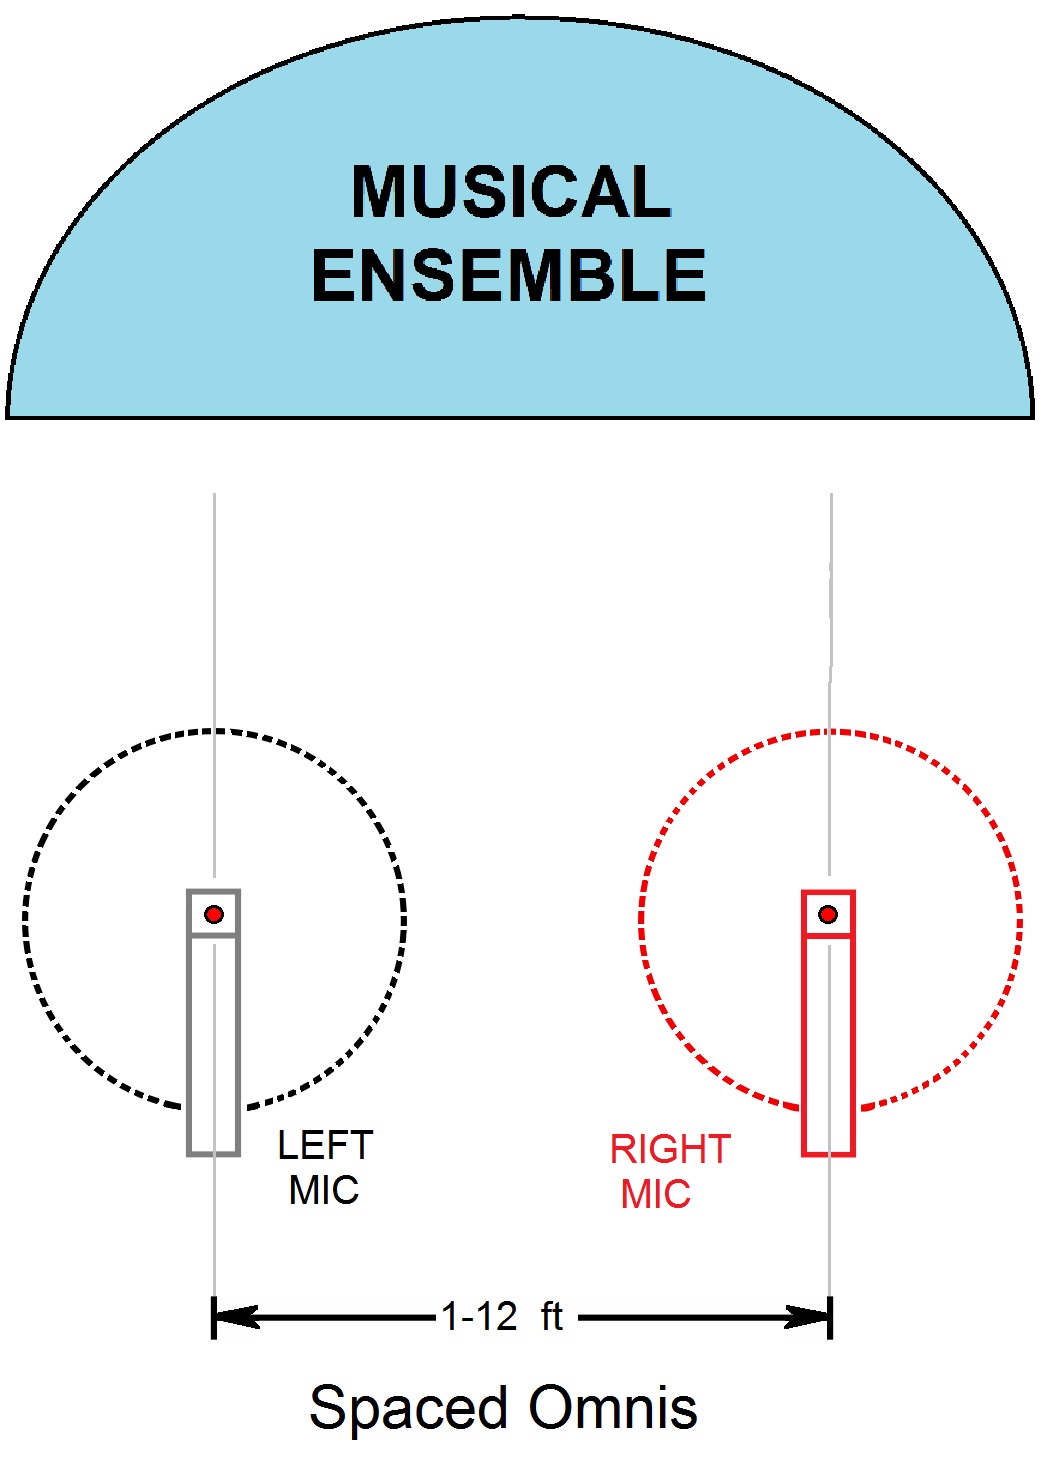
Spaced Omnis
This technique (also called the A-B technique) consists of two omnidirectional microphones facing the sound source and placed 1/2 to 4 meters (1.5 to 12 feet) apart. As with cardioids the larger spacing is used for larger sound sources. However, omnis need to be placed closer to the sound source to avoid picking up excess room sound. Omnis also produce a better balance of instruments, but produce less distinct stereo separation than cardioids. If large diaphragm condensers are used, better low frequencies will be achieved.33
Decca Tree
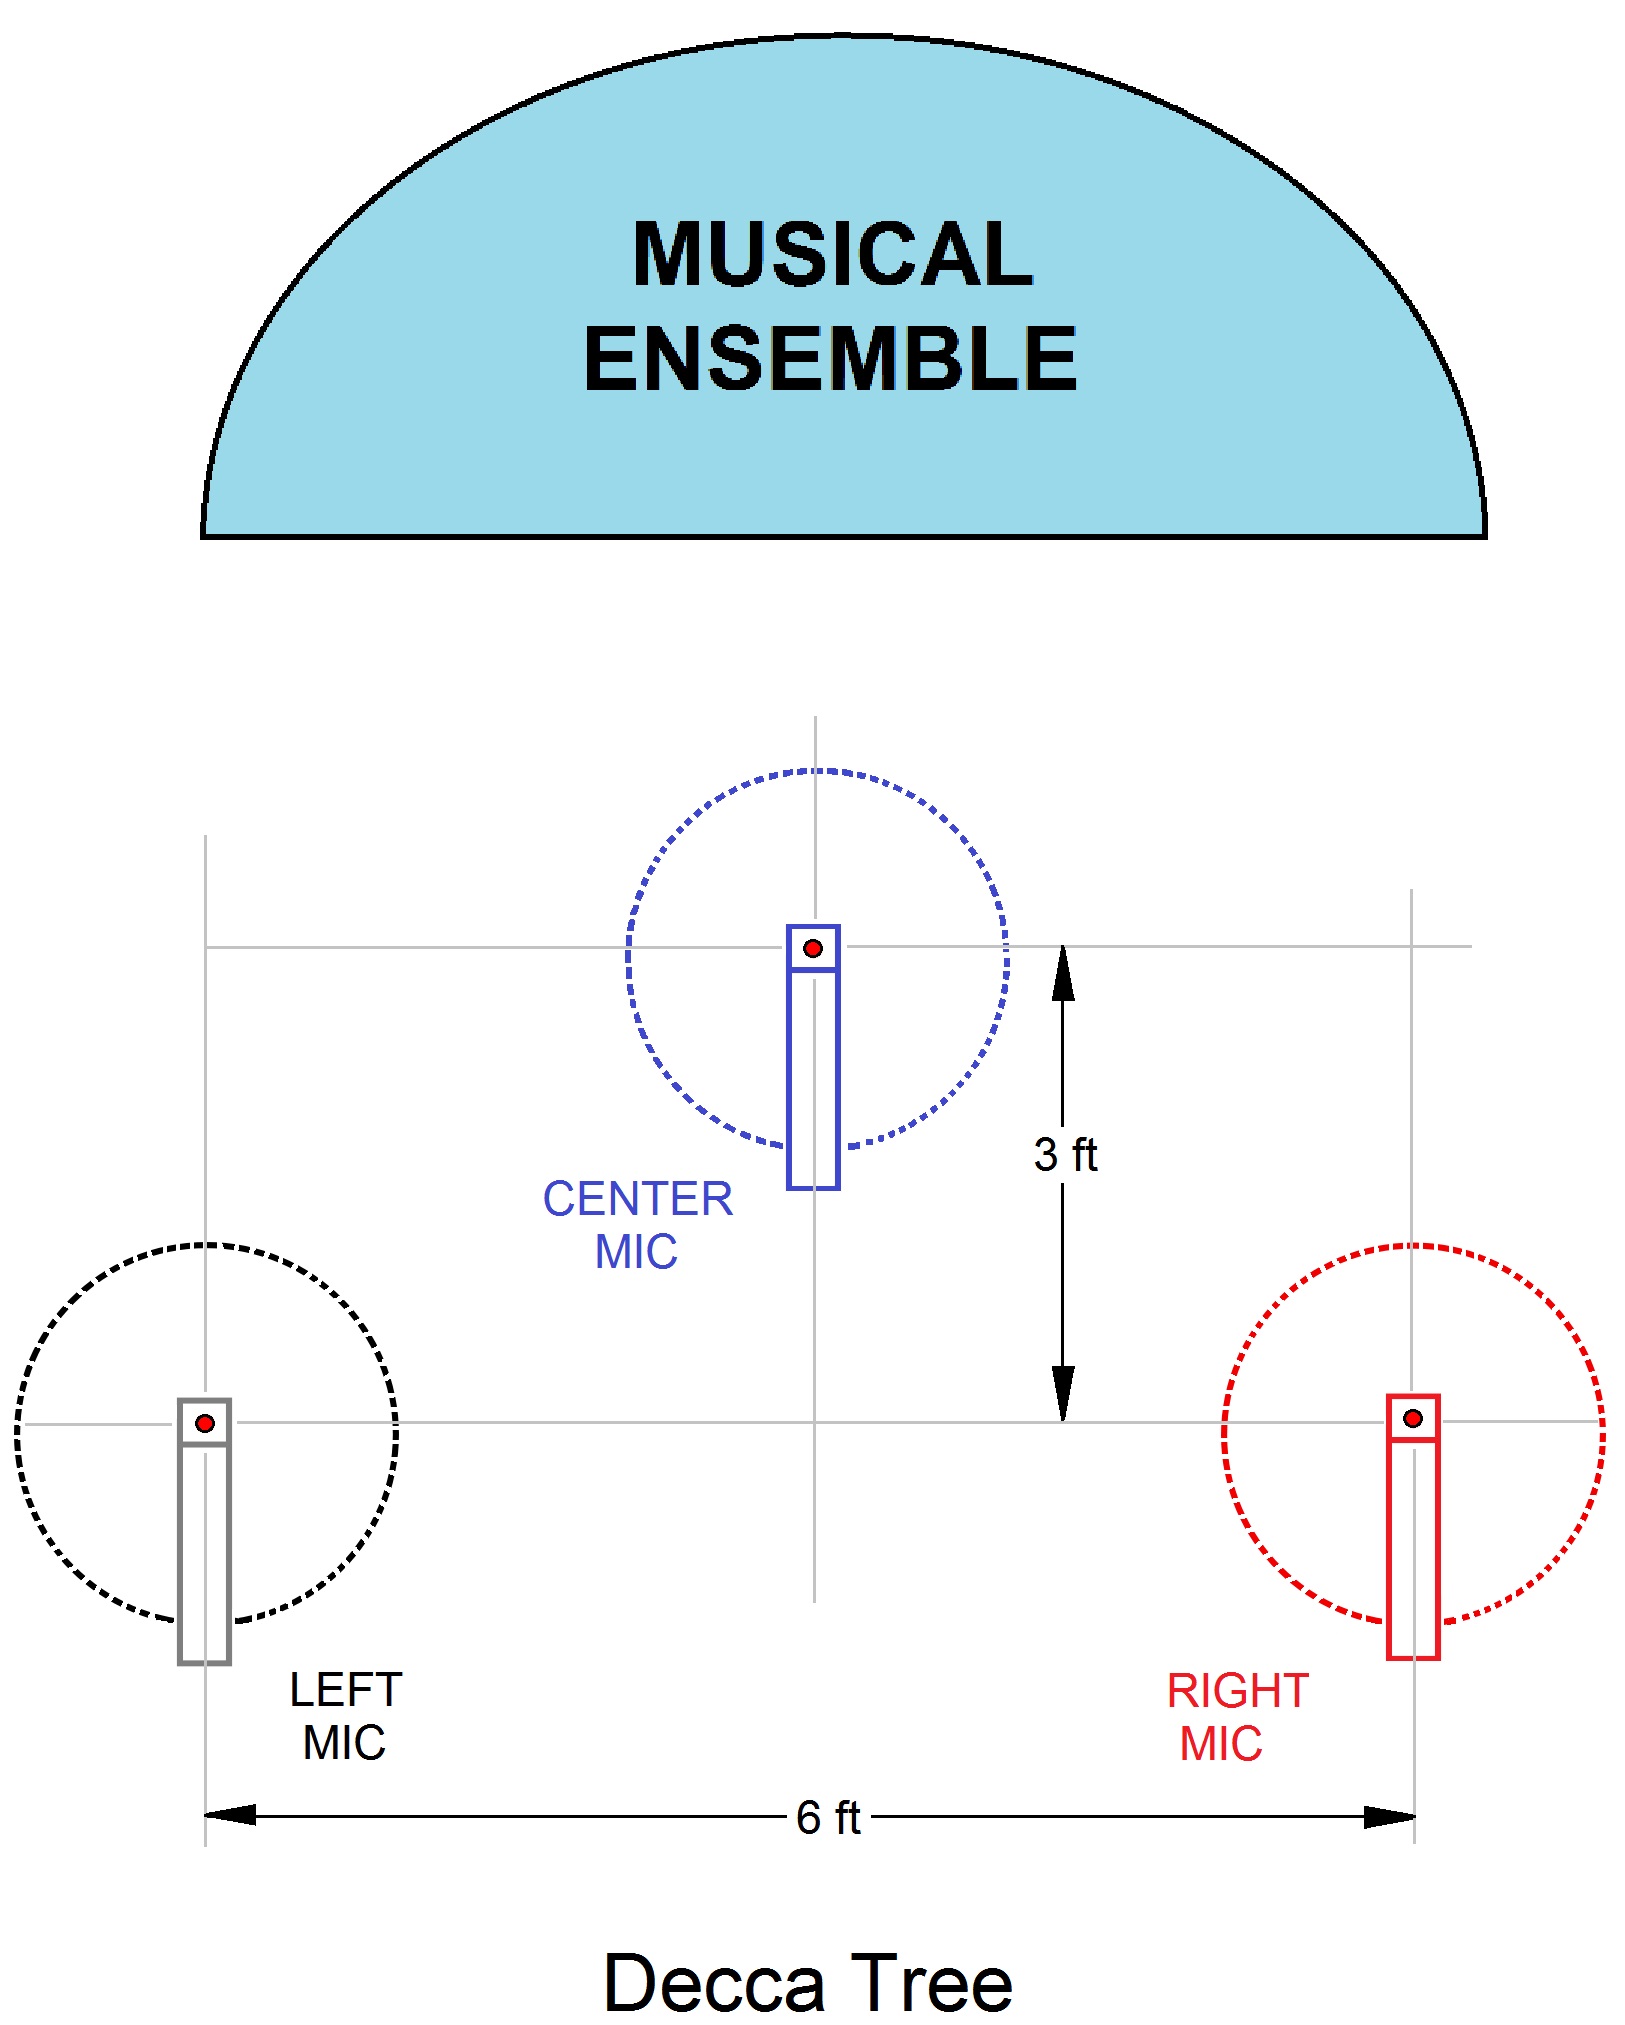 This technique was developed by Roy Wallace and Arthur Haddy at Decca Studios in London in the early 1950s. Originally it used three cardioid microphones, but later switched to omnis (Neumann M50s). The three omnidirectional microphones are arranged in a triangular pattern with the center microphone being in front of the other two. Exact spacing is not critical, but typically the two side microphones are 1 meter (3 feet) from the center and the center microphone is 1 meter (3 feet) forward, and about 2.5 to 3 meters (8 to 10 feet) above the ground. Cardioid microphones are still used sometimes, especially in noisy situations. The side microphones can be angled slightly outward, especially when recording a large group. This technique not only eliminates the “hole-in-the-middle” problem, but because the middle mic is slightly forward, it captures the sound slightly sooner than the side mics. On playback this causes the sound stage to build from the center and expand to each side, a subtle but marked improvement over other methods.34 The Decca tree produces a more spacious sound than the spaced pairs with a greater clarity and a very sharp image.35
Mercury Triad
A similar technique was developed by C. Robert Fine, while working for Mercury Records and used for their Living Presence series for recording orchestral music. It consisted of an omnidirectional microphone in front of the orchestra positioned to obtain the best mono recording usually about 3.5 m (12 ft) high. Then two additional omni mics would be added to capture the left and right sides, placed at the same height. The center mic was fed to a single-channel tape machine for the mono recording, while the signals from all three mics were sent to a separate three-track machine, which would be mixed down to 2-channel stereo. For the stereo mix, they began with the center channel and then brought up the other two channels panned left and right until the desired stereo effect was achieved. This method is also known as the Bob Fine triad, or Living Presence method.39
Baffled pairs
As mentioned above one of the goals of the near-coincident techniques is to simulate the pickup pattern of human hearing. However, the near-coincident methods place two microphones at various distances apart with nothing representing a human head between them. When an object substituting for a human head (a baffle) is placed between the micropones, the baffle diminishes sound coming from the opposite side and thereby enhances channel separation. A variety of baffles have been tried, with the main criterion being that the baffle should be acoustically absorbent to prevent sound waves from reflecting off a hard surface. The stereo field is created by a combination of time of arrival differences and intensity differences.
 Carrying the simulation of human hearing to the extreme is a method called binaural recording or binaural stereo. This technique places two omni-directional microphones into a “dummy head,” to emulate human perception of hearing. When played back through headphones, the goal is to reproduce a listening experience similar to actual listening and to eliminate the sound-in-the-middle-of-the-head phenomenon.22 Various techniques for mounting the microphones on the dummy head have been experimented with, and some very good results have been obtained. You can actually buy microphones that mount in your own ears like earbuds.37 However, since most commercial recordings are made with the idea that the music will be reproduced on stereo speakers, this technique is little more of a curiosity.
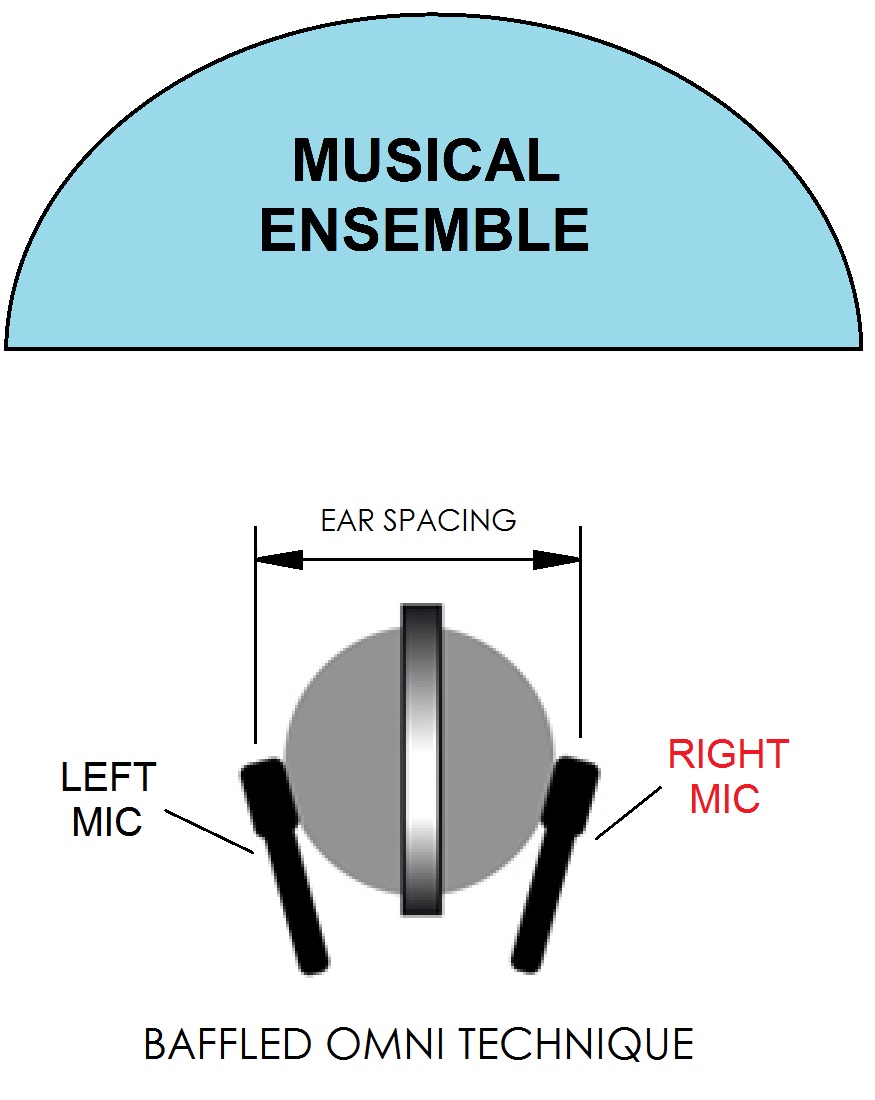
Baffled-Omni technique
The original concept for baffled pairs consisted of a sphere that approximated the size of a human head, approximately 15 to 20 cm (6 to 8 inches) in diameter. Two omni-directional small diaphragm condenser microphones are placed on each side of the sphere to simulate the spacing of human ears. The stereo field is created by a time of arrival differences at lower frequencies and intensity differences at higher frequencies. Frequency differences occur between the two microphones. This technique produces a good natural-sounding stereo stage. Because omni mics are used, recordings made in situations where there is ambient noise or poor acoustics may be a problem.
Jecklin Disk technique
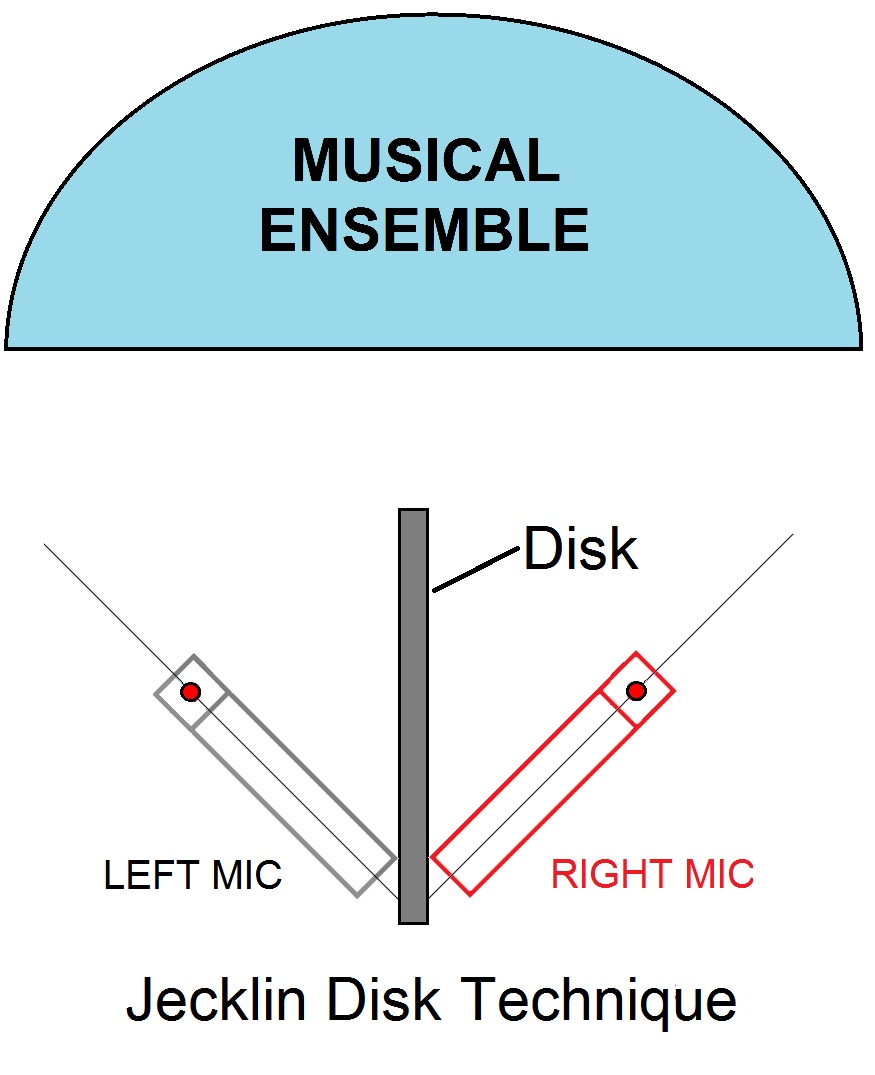 This technique, which is also called the Optimum Stereo Signal (OSS) technique, was created by Jurg Jecklin in the 1980s. Some specifications for this technique have been improved over the years. As currently configured, this method uses a 30-cm (11.8-inch) disk that is 8 mm (about 5/16 inch) thick and covered with 25 mm (1 inch) of foam. The NHK (Nippon Hoso Kyokai, the Japan Broadcasting Corporation) specification includes wrapping foam around the circumference of the disk as well. Two omni-directional small diaphragm condenser microphones are mounted one on each side of the disk and angled slightly outward.23 The capsules of the two mics are located 16.5 cm (6.5 inches) apart, which is designed to produce the correct delay between the two channels.24 The resulting recording using this technique produces a natural sound with accurate spatial distribution. Each instrument in an orchestra appears where it should. 25 A variation on the Jecklin Disk is the Schneider Disk, which adds a foam-covered sphere to the middle of the disk, to better emulate the absorption of a human head. Both disks provide excellent stereo imaging when played through speakers, but the manufacturer claims the Schneider Disk provides a slightly better binaural experience when using headphones. They recommend the Schneider Disk for small groups and the Jecklin Disk for larger orchestras and choirs.38
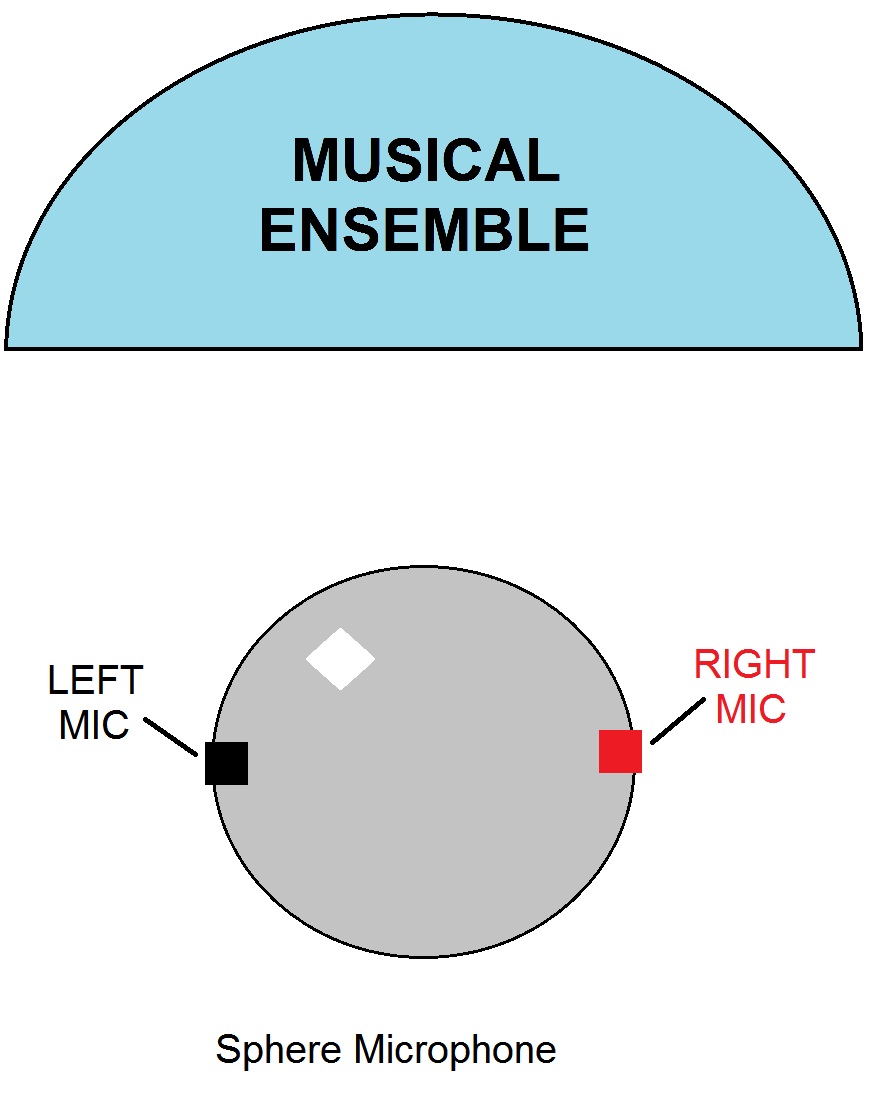 Sphere microphones
Several manufacturers make sphere microphones. These devices consist of a 20-cm (7.9-inch) diameter sphere into which two omni-directional condenser microphone capsules are embedded flush on each side. The sphere is aimed so that the capsules are 90° from the sound source.
Manufactureres are careful to point out that this arrangement does not create the binaural system produced with a “dummy head,” which is intended for listening with headphones. Rather, the sphere between the capsules creates a frequency-dependent emphasis of level differences similar to that of a human head, but the recordings are intended for reproduction using stereo loudspeakers. The resulting recordings produce a natural sounding stereo stage with excellent spatial characteristics.26
The Wedge technique
In this technique two boundary microphones (also called pressure zone microphones or PZMs) are mounted on a V-shaped wedge, about 15 cm (6 inches) from the tip of the V. The point of the wedge is aimed at the music source.
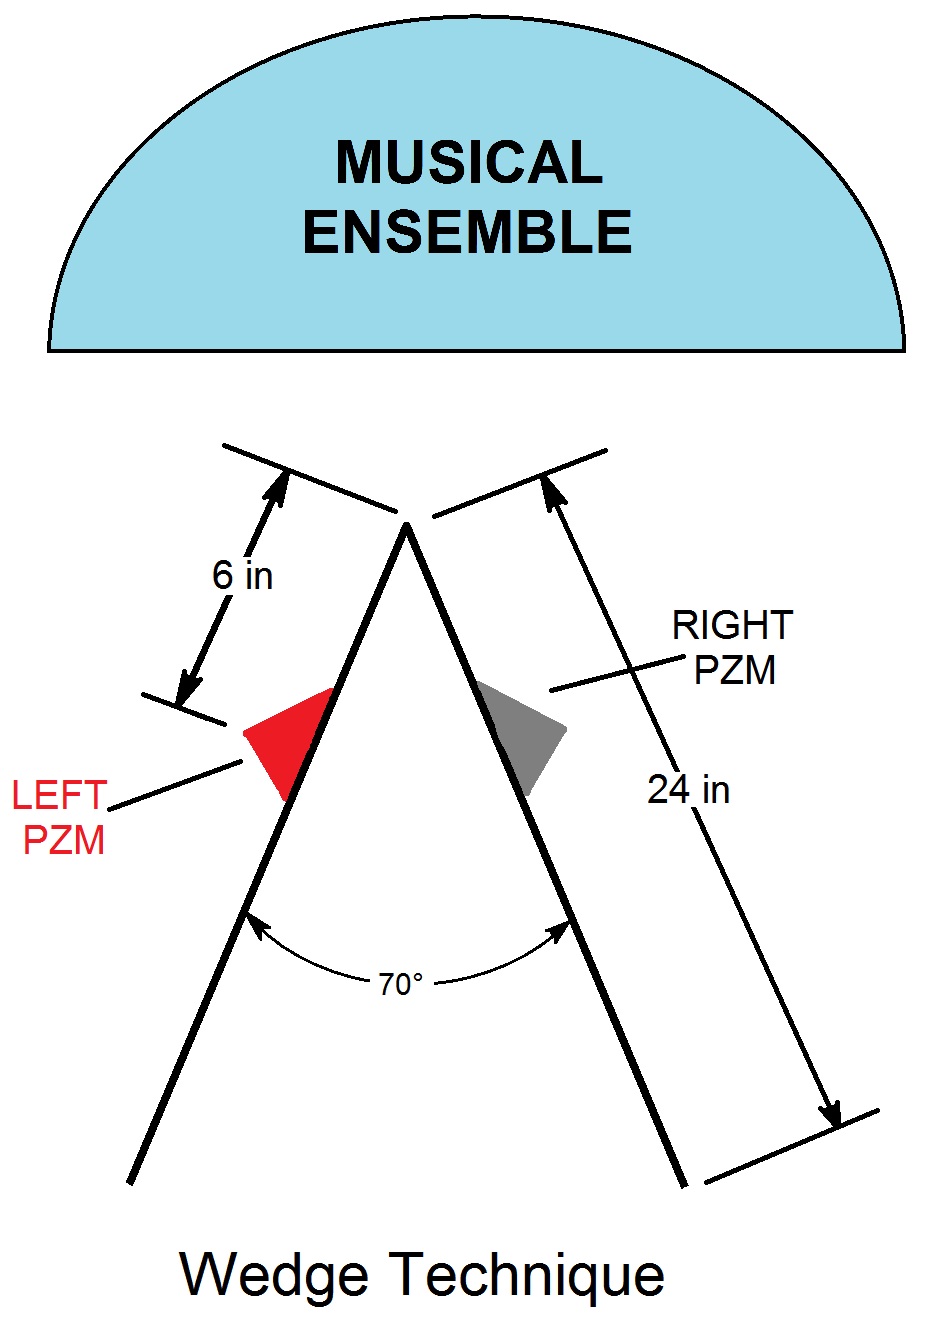 The wedge consists of two square panels approximately 60 cm (2 feet) on each side and joined together on one side to form a V with an angle of 70°.27 In the 1990s, Crown Audio further developed this concept with a patented design they call a Stereo Ambient Sampling System (SASS). It uses a two PZMs mounted on each side of an angled, flat surface with a foam baffle in between. This technique creates a realistic sounding, well-focused, natural stereo image with good spatial localization. It is also very good at capturing ambient sounds. Because the capsules are close together, there is little phase cancellation which produces good mono compatibility.28
Summary
There are numerous stereo microphone techniques, some with subtle differences, to choose from. The best choice for a given situation will depend on many factors, such whether the performance is to be broadcast or recorded, the size of the performing group, restrictions of the venue, the presence or absence of an audience, the acoustics of the performance hall, and what microphones you have available. If the goal is to produce a recording with a realistic and spacious stereo image, then the first choice would be the Decca tree. If you have only two microphones or if venue limitations prevent its use, then spaced omnis would be a good choice. If audience noises or acoustics are a problem, the make it a spaced cardioid.
If absolute mono compatibility is essential, then the M-S technique should be considered. This method also gives you the greatest flexibility when you get back to the studio to mix the recording. If that technique is not feasible for some reason, then the Blumlein pair is a good choice, except in noisy situations or in venues with poor acoustics. In that case, the X-Y method should be used.
If a better stereo image is desired and some compromise can be made on mono compatibility, then one of the near-coincident techniques should be the choice. Whatever configuration is picked, some experimentation is in order. You can adjust the spacing and angle of the microphones a little at a time until you obtain the desired effect and best stereo image.
Whatever the choice, keep in mind that these are tried and true techniques and many great recordings have been made using them.36
For a table summarizing these techniques, go to Stereo Microphone Techniques.
___________________________
Last Updated: 02/10/2025
References
1Hugh Robjohn. “Stereo Microphone Techniques Explained - Part 2,” http://www.soundonsound.com/sos/1997_articles/mar97/stereomictechs2.html (March 1997).
2Wikipedia. “Stereophonic Sound,” http://en.wikipedia.org/wiki/Stereophonic_sound (December 22, 2010).
3Bruce Bartlett. “Recording Microphone Techniques To Produce Warm, Spacious Stereo,” http://www.prosoundweb.com/article/print/better_recording_microphone_techniques_to_produce_warm_spacious_stereo (March 11, 2009).
4DPA Microphones. “Stereo Recording with DPA Microphones,” http://www.dpamicrophones.com/en/~/media/PDF/Download/stereo.pdf (2006). p. 8.
5Op. cit. Bruce Bartlett.
6Tom Bates. “Coincident or Near-Coincident Mic Placement Techniques From DPA Microphones online publications,” http://www.tufts.edu/programs/mma/mrap/StereoMicTechniques.pdf (December 22, 2010).
7Wikirecording. “About Shure's Microphone Techniques for Studio Recordings,” http://www.wikirecording.org/Shure%27s_Microphone_Techniques_for_Studio_Recording_Section_One:_Microphone_Techniques (December 22, 2010).
8Wikirecording. “X-Y Stereo Microphone Technique,” http://www.wikirecording.org/XY_Stereo_Microphone_Technique (December 22, 2010).
9Op. cit., Wikirecording. “About Shure's Microphone Techniques for Studio Recordings,”.
10Wikirecording. “What is the Mid-Side Microphone Technique,” http://www.wikirecording.org/Mid-Side_Microphone_Technique (December 22, 2010).
11Joseph Lemmer. “Analog Obsession: The Mid-Side (MS) Stereo Microphone Technique,” http://www.uaudio.com/webzine/2005/december/text/content4.html (December 22, 2010).
12Wikipedia. “Blumlein Pair,” http://en.wikipedia.org/wiki/Blumlein_Pair (December 22, 2010).
13Wikipedia. “ORTF Stereo Technique,” http://en.wikipedia.org/wiki/ORTF_stereo_technique (December 22, 2010).
14Wikirecording. “NOS Stereo Technique,” http://www.wikirecording.org/NOS_Stereo_Microphone_Technique (December 22, 2010).
15Tom Bates. Op. cit..
16Eberhard Sengpiel. “EBS Stereo System - EBS Microphone System,” http://www.sengpielaudio.com/EBS-StereoSystemEnglish.htm (April 14, 2013).
17Op. cit., Tom Bates.
18Ibid.
19Ibid.
20Eberhard Sengpiel. “Notes and review of Tony Faulkner's 'Phased Array' microphone system,” http://www.sengpielaudio.com/TonyFaulknerPhasedArray06.htm (December 23, 2010).
21Eberhard Sengpiel. “Tony Faulkner's parallel AB figure-eight microphone pair,” http://www.sengpielaudio.com/TonyFaulknerPhasedArray01Engl.pdf (December 23, 2010).
22Op. cit., Tom Bates.
23Josephson Engineering. “Tech Note 5: Optimum Stereo Signal Recording with the Jecklin Disk,” http://www.josephson.com/tn5.html (December 23, 2010).
24“Baffled stereo recording,” http://www.recording-microphones.co.uk/Jecklin-Disk.shtml (December 23, 2010).
25Op. cit., Jospehson Engineering.
26Schoeps. “KFM 6 Sphere Microphone,” http://www.posthorn.com/S_kfm6.html (January 11, 2011).
27Crown International. “Crown Boundary Microphone Application Guide,” http://www.crownaudio.com/pdf/mics/127089.pdf (2000). p. 6.
28Crown International. “Stereo PZM Microphone,” http://www.crownaudio.com/pdf/mics/126982.pdf (January 11, 2011).
29Bruce Bartlett. “Stereo Microphone Techniques,” http://www.deltamedia.com/resource/stereo_microphone_techniques.html (2006).
30Shure, Inc. “Micropahone Techniques,” http://www.shure.com/idc/groups/public/documents/webcontent/us_pro_micsmusic studio_ea.pdf (January 10, 2011). p. 21.
31Hugh Robjohn. “Stereo Microphone Techniques Explained - Part 1,” http://www.soundonsound.com/sos/1997_articles/feb97/stereomiking.html (February 1997).
32Op. cit., Tom Bates.
33Ibid.
34Op. cit., Hugh Robjohn. “Stereo Microphone Techniques Explained - Part 2,”
35Op. cit., Tom Bates.
36Michael Schulze. “Acoustic Live Recordings,” Recording. Vol. 24, No. 4 (January 2011)
37Steve Le Cerra. “Advanced Stereo-Miking Techniques,” Electronic Musician. Vol. 29, No. 6 (July 2013)
38Core Sound “Jecklin Disk and Schneider Disk microphone mounts,” http://www.core-sound.com/jecklin/1.php (accessed June 23, 2013).
39Thomas Fine. “Wilma Cozart Fine & C. Robert Fine: Mercury Living Presence Recordings,“ https://tapeop.com/tutorials/90/wilma-cozart-fine-c-robert-fine/ (accessed August 10, 2018).
If you have questions about this article or about any other topic regarding recording studios, please contact us.